Homemade Peanut Butter Cups
This brings me to my recipe for today...homemade (vegan) peanut butter cups. You're probably thinking why make them when you can easily go to the grocery story and buy some. Yeah I know, but trust me I've got my reasons ; ). For one, when I make them I know what ingredients are going into them. I can choose the chocolate and peanut butter that I want to use. This lets me make a vegan version utilizing vegan chocolate and natural peanut butter that is free of any additives...because lets face it, all peanut butter really needs is peanuts and maybe a little salt...THAT'S IT. Two, I appreciate what I eat more when I am the one actually making it. The list could go on, but I'll spare you the novel. When it comes to this recipe, I would classify it as a treat...so remember MODERATION is key. Life's to short to never have a treat...and don't think of it as cheating, but a no strings attached kind of treat ; ). I add almond flour to the peanut butter layer because I like the texture it gives when you take a bite into the peanut butter cup. It's gritty, but in a good kind of way...trust me. You will find notes throughout the directions to help explain the process better so just bear with me : )
Ingredients for chocolate layer
- 2 bags of chocolate chips (I use Enjoy Life Foods vegan chips that come in 10 oz bags)
- 3 tbs of coconut oil (divided into (2) 1.5 tbs increments)
Ingredients for peanut butter layer
- 2 tbs coconut oil
- 1/2 cup peanut butter (if you want to try a different version you could even use almond butter)
- 1/3 cup almond flour
- 2 tbs agave syrup (if agave isn't your thing then you can use honey)
- pinch of salt
Directions
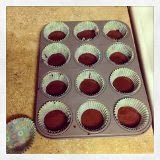
- Line a 12 cup muffin tin with cupcake liners.
- Set up a double boiler (I don't have an actual double boiler so I use a makeshift one using a pot and a glass pyrex bowl) by placing a few inches of water in a pot and setting it to low to medium heat to allow it to get to a simmer. Once this happens place your top pan (or in my case the glass bowl...you want enough water to produce steam, but not so much that water is at a high enough level to touch the bowl because it could burn the chocolate instead of melting it nicely) on top and lower the heat slightly and allow the coconut oil to melt and then add in ONE bag of chocolate chips. Stirring gently, but constantly, stir until most of the chips have melted and then turn off the heat. Continue stirring until the chocolate is smooth and all the chips have melted...it's best to do it this way and not try melting it quickly by using high heat...you want to treat it gently and not rush it...basically how you treat a lady ; ) Note: most chocolate chips you wouldn't have to add a fat source, but the vegan chips do not have soy lecithin (which acts as an emulsifier) as an ingredient so it is necessary for the best melting outcome...if you are not using vegan chips just check for soy lecithin and if it's in there then you should be good to go without the oil
- Next, distribute the melted chocolate in to 12 muffin tins. I do this using a spoon and place just enough to cover the bottom (this can be messy so I make sure to allow the spoon to drip excess chocolate before spooning it in to the cupcake liners)...if the chocolate doesn't seem to evenly distribute I lightly shake the pan side to side to allow the chocolate to flatten and smooth itself out. I usually will have a bit of melted chocolate left after this step, but it will not be enough left overs to make the top chocolate layer so that is why we actually repeat step #2 with the second bag of chocolate chips. Place the pan in the freezer for about 15 minutes to allow the chocolate to harden.
- In the meantime, mix the peanut butter layer ingredients (if necessary you can soften the peanut butter in the microwave for about 15 seconds or so...I usually do simply because I use natural peanut butter and I refrigerate mine so it tends to be harder to mix if I don't soften it). Take out the muffin tin with the hardened chocolate and place small tbs of the peanut butter mix into each cup. I then take the back of a spoon and gently flatten out the peanut butter onto the hardened chocolate...it doesn't have to be super flattened against it, but you just want to make a nice base for the top layer of chocolate to go over it. Note: I know (trust me I KNOW) it will be tempting to "taste test" all of the peanut buttery goodness, but this amount will make you just enough to use for the 12 peanut butter cups...a little taste never hurt anyone, but don't go crazy ; )
- Repeat step #2. I usually have a little bit of chocolate left from step #2 and I just leave it in there and start with the whole melting of the 1.5 tbs of coconut oil and continue with the rest of step #2. Once your chocolate is ready immediately start distributing the melted chocolate into the 12 muffin tins...very similar to how you did in step #3...shake the pan if necessary to allow the chocolate to flatten and smooth itself out. Place the muffin tin with the peanut butter cups back into the freezer for at least 30 mins to allow the top layer to set. Note: You want to not waste time doing this step because you risk the bottom layer to start melting...as soon as you have the peanut butter layer in get right onto this step.
- Finally you get to enjoy these! I like mine with a nice bite so I eat mine straight out of the freezer, but if you prefer a softer texture then allow it to sit at room temperature for a few minutes before enjoying. I always seem to have a bit of melted chocolate left after this and we usually will take banana slices or strawberries and coat them with the chocolate and place in the freezer for another treat down the road...totally up to you, but I don't see the point in wasting it ; )
 |
| Step #3 |
 |
| Step #4 |
 |
| Step #5 |
 |
| Final product |
 |
| I hope you enjoy these as much as my family and I do! |
~Christina~
Comments
Post a Comment